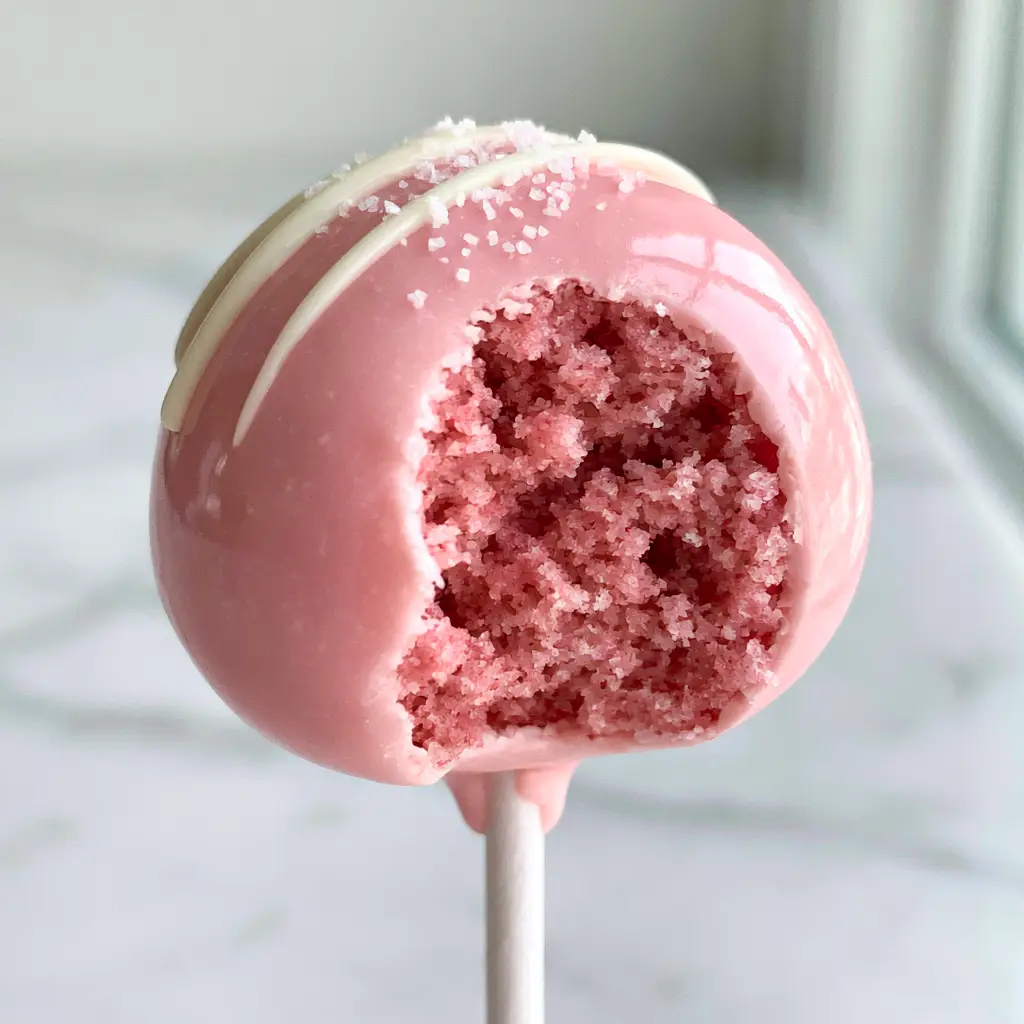
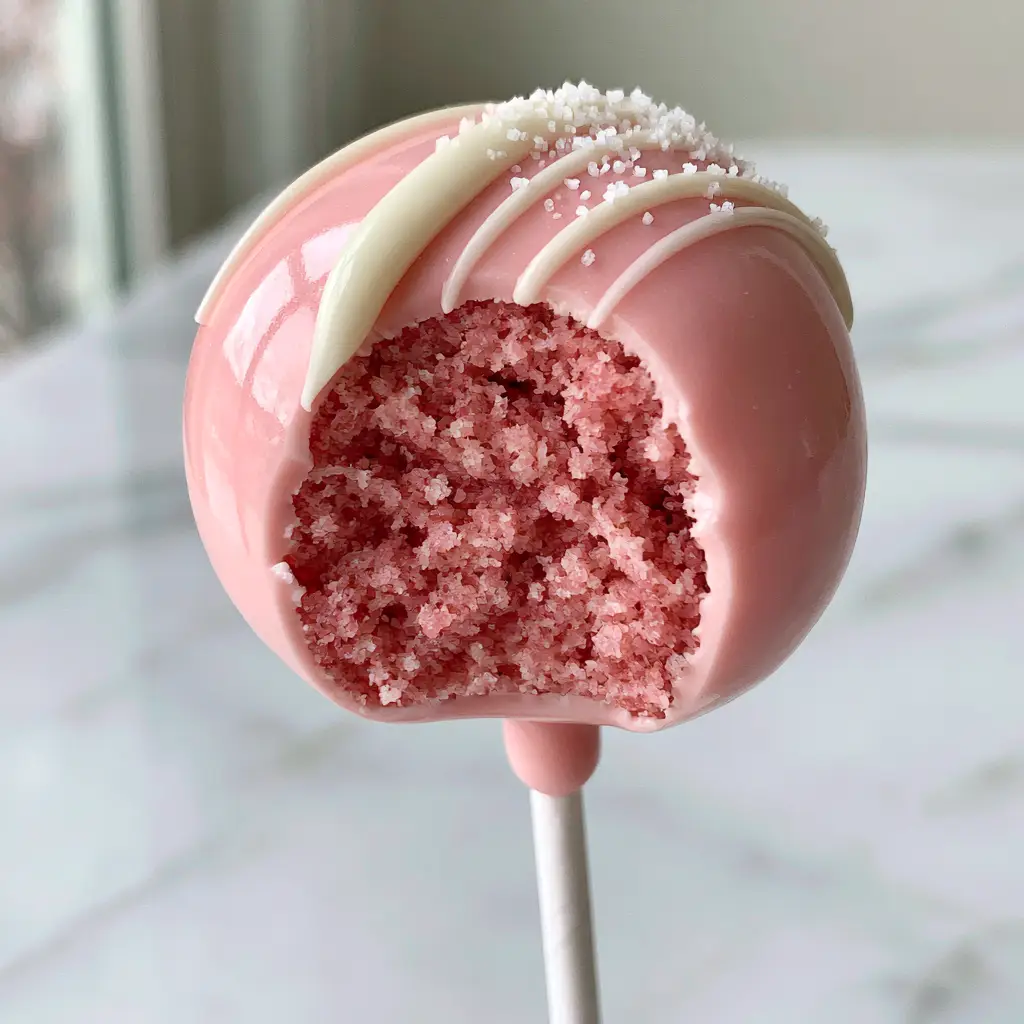
There is something undeniably magical about the perfect homemade cake pops. When you hold that pristine white stick and see the light reflecting off a glossy, pastel pink chocolate shell, it feels less like a snack and more like a work of art. But the real surprise comes with the first bite, revealing a dense, fudgy, and vibrantly pink vanilla interior that melts in your mouth.
Achieving that professional, bakery-style finish at home often feels intimidating for many home cooks. You might have struggled with cake balls falling off their sticks or chocolate coatings that look dull and lumpy instead of smooth and reflective. This guide is designed to eliminate that frustration by using culinary science to ensure your treats look exactly like a high-end boutique creation.
We are going to deep-dive into the “fudgy crumb” method, which creates a texture far superior to the dry, airy crumbs often found in store-bought versions. By balancing a moist vanilla sponge with just enough binder, we create a center that is structurally sound and incredibly decadent.
Why These Fudgy Pink Vanilla Treats Stand Out
- Ultra-Dense Texture: Unlike fluffy cake, these centers are pressed into a fudgy consistency that mimics the richness of a truffle.
- High-Gloss Finish: We utilize specific thinning techniques to ensure the candy coating is thin, snappy, and perfectly reflective.
- Monochromatic Visual Appeal: The transition from the pastel pink exterior to the deep pink interior creates a stunning visual “wow” factor.
- Professional Decoration: A delicate white chocolate drizzle and tiny sugar crystals provide a sophisticated texture that elevates the homemade look.
The Anatomy of a Perfect Pink Vanilla Crumb
To get that dense pink interior, we start with a foundational vanilla cake. The key to the color is using neon or deep pink gel food coloring rather than liquid, as liquid can alter the chemistry of the batter and result in a gummy texture.
For the binder, we avoid over-saturating the cake. If you use too much frosting, the cake pop becomes oily; too little, and it won’t hold its shape on the stick. We aim for a “play-dough” consistency that is pliable but not wet.
If you enjoy experimenting with different textures in your confections, you might also want to try these decadent brownie refrigerator cake techniques for your next no-bake project.
Essential Ingredients for Your Homemade Cake Pops
The Foundation: Pink Vanilla Cake
1 ½ cups (190g) All-Purpose Flour: This provides the necessary structure for a cake that needs to be crumbled and compressed.
1 cup (200g) Granulated Sugar: Sweetness is vital, but sugar also aids in moisture retention, keeping the “fudge” factor high.
1 ½ tsp (6g) Baking Powder: A foundational leavening agent that ensures the initial cake isn’t too heavy before we crumble it.
½ cup (115g) Unsalted Butter, Softened: The fat source that carries the vanilla flavor and creates a tender crumb.
1 large Egg: Acts as a binder and provides the proteins necessary for the cake to hold together during the crumbling process.
½ cup (120ml) Whole Milk: The liquid component that hydrates the flour and helps distribute the pink coloring evenly.
1 tsp (5ml) Vanilla Extract: Use high-quality extract to ensure the “vanilla” profile stands up against the sweet candy coating.
Pink Gel Food Coloring: A concentrated pigment that gives the crumb its vibrant, dense pink hue without thinning the batter.
The Assembly and Coating
¼ cup (60g) Vanilla Frosting: This acts as the “glue” or binder that transforms crumbs into a fudgy dough.
12 oz (340g) Pastel Pink Candy Melts: A specialized coating chocolate designed to melt smoothly and set firmly with a high gloss.
2 oz (55g) White Chocolate Wafers: Used specifically for the delicate drizzle contrast on top of the pink shell.
1 tbsp (15ml) Coconut Oil or Paramount Crystals: The secret “invisible” ingredient that thins the coating for a drip-free finish.
Tiny White Sugar Crystals: Provides a subtle crunch and a professional, sparkling aesthetic.
Specialized Equipment for Boutique Results
To achieve the “smartphone-perfect” look described in our blueprint, you need a few specific tools. A pristine white paper stick is essential for the classic look, providing a clean contrast to the pink chocolate.
A styrofoam block or a dedicated cake pop stand is non-negotiable. If you lay the wet pops down on parchment, you will get a flat side, ruining the “perfectly smooth” visual we are aiming for. Additionally, a small microwave-safe deep bowl or silicone cup is better for dipping than a wide bowl, as it allows for a full vertical submerge.
Step-by-Step Evolution of the Perfect Pop
Baking the Pink Canvas
Preheat your oven to 350°F (175°C). Cream the butter and sugar until light and fluffy, then add the egg and vanilla. Incorporate the pink gel coloring until the batter is a shade darker than your target interior—it will lighten slightly during baking.
Fold in the dry ingredients alternating with the milk. Bake in a greased 8-inch pan for 25-30 minutes. You are looking for the edges to just pull away from the pan, but the center to remain moist.
The Fudgy Transformation
Once the cake is completely cool, trim off any browned edges. Break the pink sponge into small pieces and place them in a large bowl. Using your hands or a stand mixer, crumble the cake until it resembles fine sand.
Add the vanilla frosting one tablespoon at a time. Mix until the dough can be rolled into a ball without cracking. It should feel like dense, moist fudge. Roll into 1-inch balls, ensuring they are perfectly spherical and smooth.
The Anchoring Technique
Melt a small amount of the pink candy melts. Dip the tip of each white paper stick into the melted chocolate (about ½ inch) and then insert it halfway into the cake ball. This creates a “seal” that prevents the pop from sliding off the stick later. Chill the anchored balls for 20 minutes to set the seal.
Achieving the Glossy Shell
Melt the remaining pink candy melts with the coconut oil, stirring until the mixture flows like warm honey. Submerge a chilled cake pop vertically into the coating until it reaches the base of the stick. Pull it straight up and gently tap your wrist—not the stick—to remove excess coating.
Before the pink coating sets completely, melt the white chocolate and use a spoon or piping bag to create a delicate, thin drizzle. Immediately sprinkle the tiny white sugar crystals over the top so they adhere to the wet chocolate. Place the stick into your stand to dry.
Expert Tips for Success
- Temperature Control: Never dip a frozen cake ball into hot chocolate. The extreme temperature difference will cause the coating to crack as it cools. Room temperature balls or slightly chilled are best.
- The “Wrist Tap”: To avoid drips at the base, tap your wrist gently while holding the stick at a 45-degree angle, rotating the pop slowly.
- Thinning is Key: If your candy melts are too thick, the coating will be heavy and may pull the cake off the stick. Always use a little coconut oil to achieve a “fluid” consistency.
- Avoid Over-Mixing: When adding the binder, stop as soon as the dough holds together. Over-mixing can make the interior too gummy instead of fudgy.
Pairing and Presentation
These homemade cake pops are the ultimate party treat, but they shine even brighter when paired with the right refreshments. For a coordinated pink theme, serve these alongside a refreshing homemade strawberry dole whip or a glass of sparkling unicorn lemonade.
If you’re hosting a summer gathering, these pops provide a mess-free alternative to traditional cake slices. They pair beautifully with other handheld treats like cinnamon swirl blondies for a varied dessert platter.
Storage and Freshness Guide
Room Temperature: You can keep the finished pops in an airtight container at room temperature for up to 3 days. Ensure the environment is cool, as the candy coating can soften in humidity.
Refrigeration: For longer storage, refrigerate for up to one week. However, note that condensation may form on the glossy shell when brought back to room temperature, which can dull the shine.
Freezing: Cake pops freeze exceptionally well. Wrap them individually in plastic wrap and store in a freezer bag for up to 6 weeks. Thaw in the refrigerator before serving.
Frequently Asked Questions
It is best to use gel food coloring. Liquid coloring adds too much moisture and can affect the pH of the batter, leading to a texture that is gummy rather than fudgy.
Thin your candy melts with a teaspoon of coconut oil or paramount crystals. This reduces the viscosity, allowing the excess chocolate to run off smoothly without leaving lumps or thick streaks.
When stored in an airtight container at room temperature, they stay fresh for up to 3 days. In the refrigerator, they last about a week, though the coating may lose some shine due to moisture.
Cracking is caused by extreme temperature changes. If you dip frozen cake balls into warm chocolate, the cake expands as it warms, cracking the rigid shell. Always dip chilled or room temperature cake balls.
This usually happens because the cake ball is too heavy or the ‘seal’ wasn’t set. Always dip your stick in melted chocolate before inserting it into the ball, and ensure your binder-to-cake ratio isn’t making the pops too soft.
The Master Homemade Cake Pops Recipe
Homemade Cake Pops: The Ultimate Guide to Fudgy Pink Vanilla Treats
Ingredients
Equipment
Method
- Cream butter and sugar, add egg and vanilla. Mix in pink gel. Alternately add dry ingredients and milk. Bake at 350°F (175°C) for 25-30 minutes.
- Cool completely. Remove browned edges and crumble cake into fine sand-like particles.
- Add frosting to crumbs one tablespoon at a time until a dense, fudgy dough forms. Roll into 1-inch spheres.
- Dip white sticks into melted pink chocolate, then insert into cake balls. Chill for 20 minutes.
- Thin melted pink coating with coconut oil. Submerge pops fully, tap off excess. The coating should be perfectly smooth and glossy.
- Apply a thin white chocolate drizzle and a light dusting of white sugar crystals while the coating is still wet.
Notes
Use gel food coloring for the cake to avoid altering the moisture balance.
Bring the Bakery Home
Mastering homemade cake pops is a rewarding culinary skill that combines baking precision with artistic flair. The contrast of the snappy pastel shell against the fudgy pink interior makes these a guaranteed hit at any celebration. We would love to see your creations! Share your results and tag us, or follow our latest treats on Pinterest.