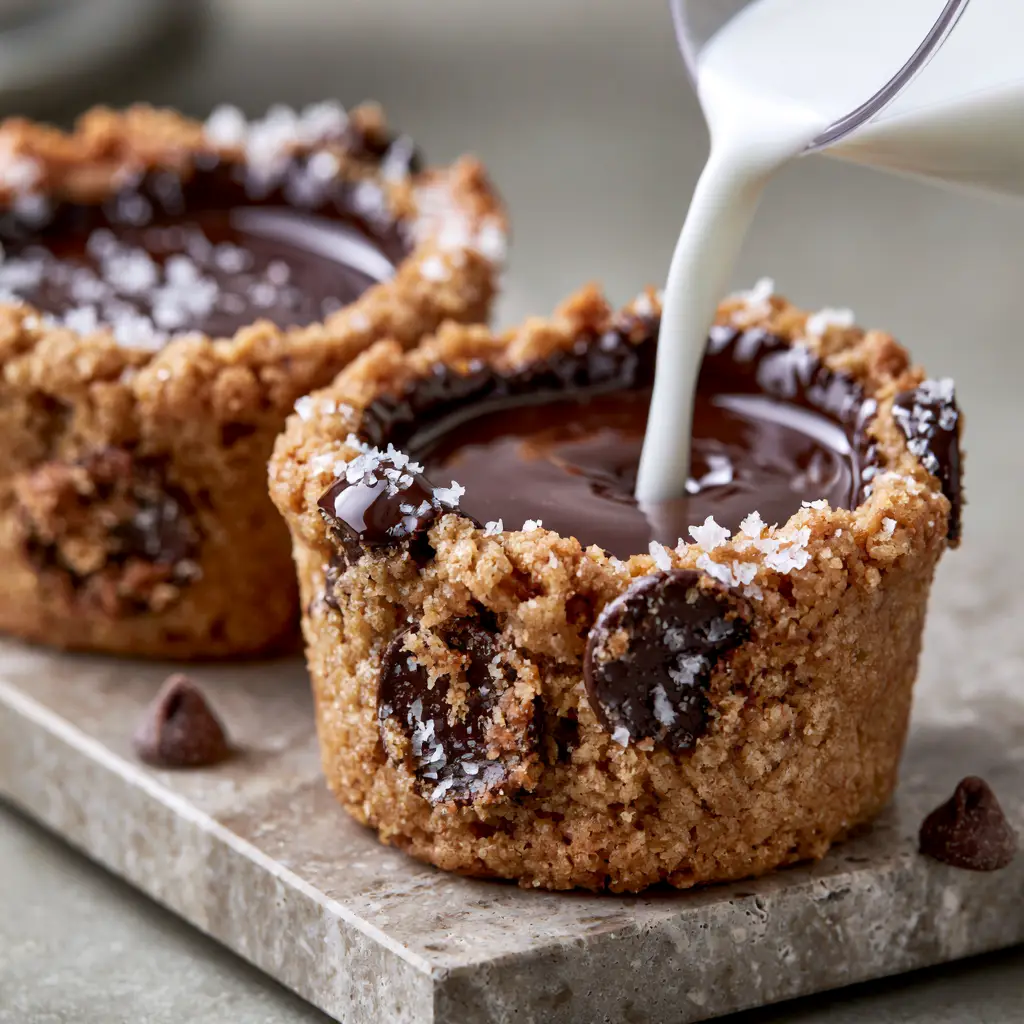
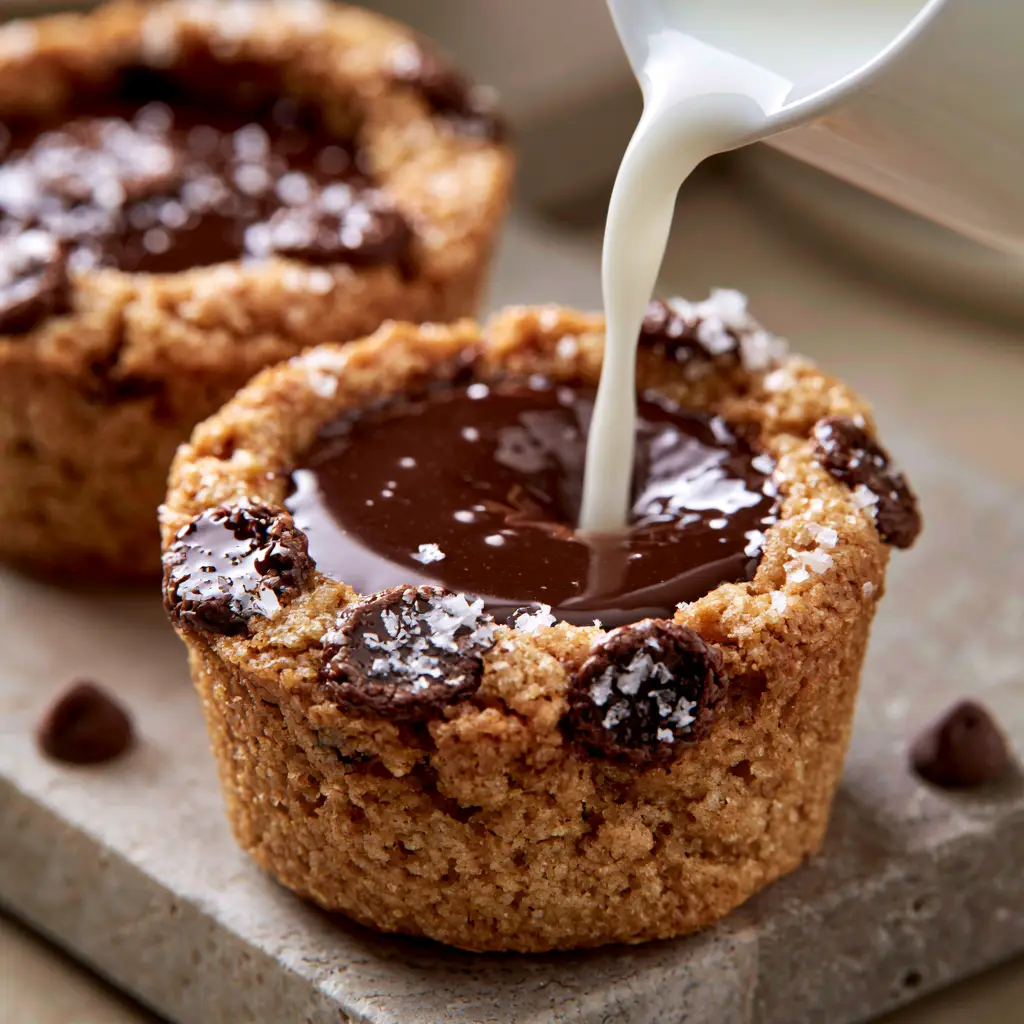
Cookie Shots are the ultimate viral dessert sensation that combines the nostalgic comfort of a warm chocolate chip cookie with the fun of a celebratory toast. These thick, golden-brown cookie cups are engineered to be the perfect vessel for ice-cold milk, featuring a flawless, glossy dark chocolate lining that prevents leaks and adds a rich, velvety texture to every bite. Whether you are hosting a party or looking for a Pinterest-worthy weekend project, mastering the art of the Cookie Shot is a guaranteed way to impress your guests and satisfy your sweetest cravings.
Inspired by the iconic chocolate chip cookie shots popularized in NYC bakeries, this version focuses on a sturdy yet chewy texture, dotted with half-melted dark chocolate discs and a generous sprinkle of flaky sea salt. The contrast between the crunchy, golden exterior and the cold, creamy milk creates a sensory experience that is truly unmatched. By following this guide, you will learn the culinary secrets to creating a leak-proof cookie vessel that looks just as good as it tastes.
Why You Will Obsess Over These Viral Cookie Shot Glasses
- Perfect Structural Integrity: These aren’t crumbly cookies; they are thick, durable Cookie Shots designed to hold liquid without getting soggy.
- Glossy Leak-Proof Lining: A thick layer of dark chocolate creates a flawless waterproof barrier inside the cup.
- Salty-Sweet Balance: The addition of flaky sea salt on the rim elevates the dark chocolate discs for a gourmet finish.
- Interactive Fun: Perfect for parties, where you can serve everything from milk to dessert-inspired cocktails.
- Stunning Aesthetics: The golden-brown texture and melting chocolate chips make these a Pinterest-viral masterpiece.
The Secret Ingredients for Sturdy and Delicious Cookie Shots
Creating a Cookie Shot requires a specific balance of ingredients to ensure the cup holds its shape during the baking process without puffing up too much. Unlike a standard chocolate chip cookie bar, we need a “stiff” dough that acts like edible architecture.
- Unsalted Butter (1 cup / 225g): Cold and cubed butter helps maintain the structure; we aren’t looking for a spreadable dough here.
- Brown Sugar (1/2 cup / 100g) & Granulated Sugar (1/3 cup / 65g): The brown sugar provides chewiness, while the white sugar aids in that golden-brown crispness.
- All-Purpose Flour (3 cups / 375g): A higher flour count is the secret to a sturdy wall that won’t collapse in the oven.
- Egg Yolk (1 large): Using just the yolk adds richness without the extra moisture and leavening power of the egg white.
- Dark Chocolate Discs (1 cup / 170g): These provide those beautiful “half-melted” pools of chocolate visible on the outer crust.
- Flaky Sea Salt: Essential for cutting through the sweetness and adding a professional visual touch.
- Dark Chocolate Melting Wafers (1.5 cups / 250g): High-quality melting chocolate ensures a thick, glossy dark chocolate inner lining.
- Cold Whole Milk: The classic filling that creates that iconic splash when poured into the finished cup.
Step-by-Step Architecture: Crafting the Perfect Cookie Vessel
1. Preparing the Stiff Cookie Dough
In a large stand mixer, cream together your cold, cubed butter with the brown and white sugars. Do not over-mix; you want the mixture to be combined but not overly aerated. Add the egg yolk and vanilla extract, mixing until just incorporated. Sift in the flour and salt, then fold in the dark chocolate discs. The dough should feel much stiffer than your average cookie cup dough—this is intentional!
2. Molding the Cookie Shots
Grease your Cookie Shot mold (a silicone shot glass mold or a popover pan works best). Take about 2 tablespoons of dough and press it firmly into the bottom and up the sides of the mold. Ensure the walls are roughly 1/4 inch (6mm) thick. Use your thumb to create a clean, flat rim at the top. Pro Tip: Chill the molded dough in the freezer for at least 30 minutes before baking to prevent the dough from sliding down the sides.
3. The Golden-Brown Bake
Preheat your oven to 350°F (175°C). Place the chilled molds on a baking sheet. Bake for 18–22 minutes. Visual Cue: Look for the edges to turn a deep, toasted golden-brown. The centers may still look slightly soft, but they will firm up as they cool. Remove from the oven and, if the centers puffed up, gently press them back down with a small spoon while still warm.
4. The Glossy Chocolate Waterproofing
Once the cookie cups are completely cool and removed from the molds, melt your dark chocolate wafers until smooth. Spoon about 1 tablespoon of melted chocolate into the center of a cup. Rotate the cup slowly, allowing the chocolate to coat the entire interior right up to the rim. Pour out any excess. This creates that thick glossy dark chocolate inner lining that makes these Cookie Shots leak-proof. Immediately sprinkle the rim with flaky sea salt while the chocolate is wet.

Expert Tips for Pinterest-Perfect Results
- Temperature Control: Always use cold whole milk for the pour. If the milk is room temperature, it can soften the chocolate lining too quickly.
- The “Splash” Factor: For the best photos, pour the milk from about 6 inches above the cup to create that clean, viral splash effect.
- Preventing Leaks: Double-check that there are no pin-sized holes in your chocolate lining. A second coat of chocolate ensures 100% security.
- Miniature Chips: If you don’t have discs, use mini chocolate chips. Standard chips are often too bulky for the thin walls of the shot glass.
- Experiment with Fillings: While milk is classic, these are also incredible when filled with strawberry fluff or even a splash of Kahlua.
Storage, Reheating, and Make-Ahead Instructions
Storage: These Cookie Shots can be stored in an airtight container at room temperature for up to 3 days. If you have already lined them with chocolate, keep them in a cool, dry place so the lining doesn’t melt.
Freezing: You can freeze the unlined cookie cups for up to 2 months. When ready to serve, thaw at room temperature and then apply the fresh chocolate lining. This is a great way to prep for large parties in advance.
Reheating: We do not recommend reheating the finished, chocolate-lined shots, as the lining will melt and lose its waterproof seal. These are best enjoyed at room temperature with cold milk.
What to Serve With Cookie Shots
These treats are a dessert centerpiece on their own, but they pair beautifully with other finger foods. Consider serving them alongside cookie dough banana bread for a full-on chocolate chip theme. If you’re hosting a brunch, these look stunning next to a cinnamon roll cake. For a colorful contrast on your dessert board, add a few funfetti cookie sandwiches to the mix!
Frequently Asked Questions
Yes! You can use a popover pan or even a standard muffin tin by pressing the dough around the outside of the cups, though a dedicated silicone shot glass mold provides the most consistent results.
The key is the dark chocolate lining. Ensure you coat the entire interior with a thick layer of melted chocolate, covering any pores in the cookie. Let the chocolate set completely before pouring in the milk.
Thanks to the chocolate barrier, the cookie will stay crunchy for about 20-30 minutes. However, for the best experience, we recommend drinking the milk and eating the cookie shortly after pouring.
Ice-cold whole milk is the traditional choice for its creamy flavor, but you can also use oat milk, almond milk, or even a creamy chocolate liqueur for an adult version.
This usually happens if the dough is too soft or hasn’t been chilled long enough. Ensure you use cold, cubed butter and freeze the molded dough for at least 30 minutes before baking to maintain the cup shape.
The Official Golden-Brown Cookie Shots Recipe
Cookie Shots: The Ultimate Chocolate Chip Milk Cups Recipe
Ingredients
Equipment
Method
- Cream cold butter and sugars in a stand mixer until combined. Add egg yolk and vanilla.
- Mix in flour and salt until a stiff dough forms. Fold in chocolate discs.
- Press dough into greased shot glass molds, forming 1/4 inch thick walls. Freeze for 30 minutes.
- Bake at 350°F (175°C) for 18-22 minutes until golden-brown. Cool completely before unmolding.
- Melt dark chocolate and coat the interior of each cup. Sprinkle rims with flaky sea salt. Let set.
- Fill each cup with cold whole milk right before serving.
Notes
Ensure the chocolate lining has no gaps to prevent milk from leaking.
Save This Recipe to Pinterest!
Did you love these Cookie Shots? Make sure to save this recipe to your Dessert Board on Pinterest so you never lose it! Follow @alicecooks_official for more viral baking inspiration. If you make these at home, leave a comment below and share a photo of your creation—we love seeing those milk splashes! Don’t forget to give this recipe a 5-star rating if it was a hit in your kitchen.