When you crave the buttery, laminated crunch of a bakery-fresh pastry but want the nostalgic comfort of a warm cookie, these Chocolate Chip Cookie Dough Twists are the answer. This recipe bridges the gap between sophisticated puff pastry and indulgent street food, creating a handheld treat that is as visually stunning as it is delicious.
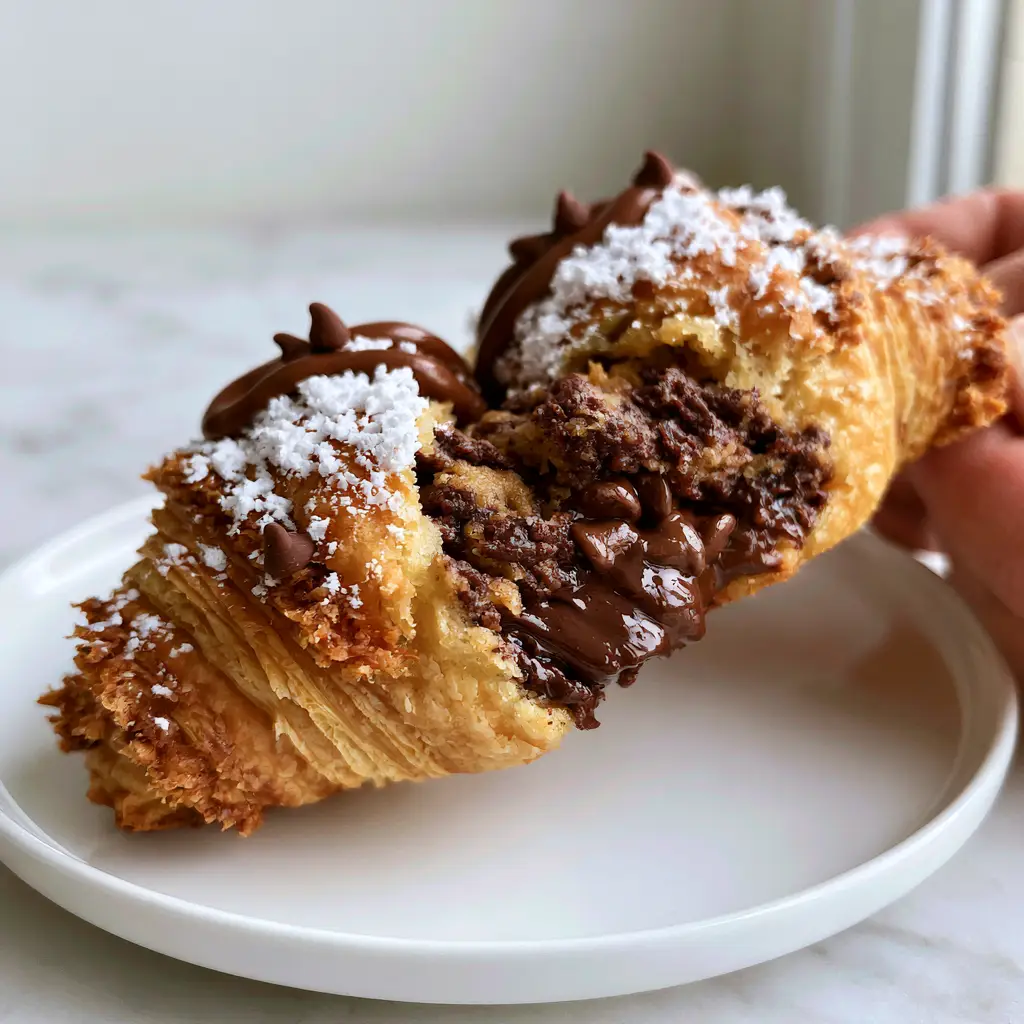
Imagine pulling apart a warm, golden-brown crescent twist to reveal a thick, molten center of melted milk chocolate chips and gooey cookie dough. The exterior, dusted with a delicate snow of powdered sugar and finished with a glossy chocolate drizzle, provides a structural crunch that gives way to a soft, pillowy interior. This isn’t just a snack; it is a sensory experience designed for home cooks who appreciate the science of texture.
Whether you are hosting a brunch or looking for a late-night indulgence, the Chocolate Chip Cookie Dough Twists deliver a professional-grade result with surprisingly little effort. We have engineered this recipe to ensure the dough remains flaky while the cookie dough center stays perfectly soft, avoiding the common pitfall of a dry, overbaked interior.

Why You Will Crave These Molten Cookie Dough Twists
- Multi-Textural Brilliance: You get the crispy, laminated edges of the crescent dough paired with a thick, molten cookie dough core.
- Visual Showstopper: The combination of the dark chocolate drizzle and the fine dusting of powdered sugar makes these look like they came from a high-end patisserie.
- Perfect Ratios: We have balanced the sweetness of the milk chocolate chips inside with the slight bitterness of mini semi-sweet chips on top.
- Fast-Track Gourmet: By using refrigerated crescent dough as a base, you achieve professional lamination without the hours of folding butter.
The Anatomy of a Perfect Pastry Twist: Essential Ingredients
To achieve the specific visual and structural results seen in our professional benchmarks, every ingredient serves a forensic purpose. We aren’t just mixing sugar and flour; we are building a dessert architecture that holds up under heat.
Refrigerated Crescent Dough Sheet: 1 tube (226g). This provides the flaky, golden-brown foundation. The pre-chilled fat in the dough creates steam pockets during baking, leading to those visible crispy, laminated puff pastry edges.
Edible Chocolate Chip Cookie Dough: 1 cup (250g). It is vital to use a dough that is designed to stay soft. If you are making your own, ensure you use heat-treated flour for safety, similar to the base used in gourmet cookie dough truffles.
Milk Chocolate Chips: 1/2 cup (90g). These go inside the twist. Milk chocolate has a lower melting point than dark chocolate, ensuring that “molten” pull-apart effect when the pastry is warm.
Mini Semi-Sweet Chocolate Chips: 2 tbsp (30g). These are the “clingers.” Their small size allows them to adhere to the warm chocolate drizzle and the golden crust without weighing down the pastry.
Powdered Sugar: 2 tbsp (15g). A light dusting provides a flavor contrast to the rich chocolate and mimics the “delicate snow” aesthetic of a professional bakery.
Chocolate Drizzle: 1/4 cup (60ml) of high-quality chocolate sauce or melted semi-sweet chips mixed with 1 tsp (5ml) of coconut oil for gloss. This creates the signature glossy finish that remains slightly soft to the touch.
Foundational Fat: 1 tbsp (14g) of melted unsalted butter. Brushing the dough before baking encourages the Maillard reaction, turning the exterior a deep, even golden-brown.
Essential Culinary Tools for Bakery-Quality Results
To replicate the handheld smartphone photo aesthetic, you need the right tools to handle the delicate dough and the molten filling without creating a mess.
A heavy-duty baking sheet lined with parchment paper is non-negotiable. This prevents the sugars in the dough from sticking and ensures the bottoms don’t burn before the centers are warm. You will also need a sharp pizza cutter or a bench scraper to create clean, even strips for twisting.
Finally, a fine-mesh sieve is required for the powdered sugar dusting. Simply shaking sugar from a spoon will create clumps; the sieve ensures that “delicate snow” appearance that highlights the rich textures of the pastry.
Engineering the Perfect Twist: Step-by-Step Instructions
Preparing the Laminated Base
Preheat your oven to 375°F (190°C). Unroll your refrigerated crescent dough sheet onto a lightly floured surface. If you are using standard crescent rolls, firmly press the perforations together to create a single, seamless rectangle.
Brush the surface lightly with a thin layer of melted butter. This acts as an adhesive for the filling and adds an extra layer of richness to the internal crumb, much like the technique used for classic carnival funnel cakes.
Applying the Gooey Center
Gently flatten your cookie dough until it is about 1/4 inch (6mm) thick. Place it over one half of the crescent dough sheet. Sprinkle the 1/2 cup (90g) of milk chocolate chips evenly over the cookie dough layer.
Fold the empty half of the crescent dough over the filling, creating a large sandwich. Press the edges firmly to seal. This “envelope” method ensures that the molten milk chocolate stays trapped inside the twist rather than leaking onto the pan.
Executing the Visual Twist
Using a pizza cutter, slice the dough into 1-inch (2.5cm) wide strips. Pick up each strip and gently twist it three to four times. You want to see the layers of dough and cookie dough spiraling together.
Place the twists on your prepared baking sheet, leaving at least 2 inches (5cm) between them. As they bake, the steam will cause them to expand, creating those crispy puff pastry edges we are looking for. If you enjoy this filling, you might also like our cookie dough pastry cups.
Baking for Sensory Perfection
Slide the tray into the center rack of the oven. Bake for 12-15 minutes. You are looking for a specific sensory cue: the exterior should be a vibrant golden-brown, and the tips of the twists should look dry and crispy.
Listen for a very faint sizzle; this is the butter in the dough frying the exterior slightly. Remove from the oven and let them sit on the hot pan for exactly 2 minutes. This allows the internal cookie dough to “set” just enough so it doesn’t run out when you pick them up.
Expert Tips for a Flawless Pull-Apart Finish
- Temperature Control: Keep your crescent dough in the fridge until the very second you are ready to roll it out. Cold fat is the secret to flaky layers.
- The Drizzle Secret: When melting chocolate for the drizzle, add a tiny drop of coconut oil. This gives it a professional “gloss” that doesn’t matte as it cools.
- Avoid Over-Twisting: If you twist the dough too tightly, the center won’t have room to expand, leading to a dense, doughy core instead of a light, airy one.
- The Sugar Dusting: Wait until the twists are slightly warm, but not hot, to apply the powdered sugar. If they are too hot, the sugar will melt into a glaze; if they are cold, it won’t adhere.
Storage, Reheating, and Make-Ahead Advice
These Chocolate Chip Cookie Dough Twists are at their peak performance within 20 minutes of leaving the oven. However, if you have leftovers, store them in an airtight container at room temperature for up to 2 days.
To reheat and reclaim that molten center, avoid the microwave, which will make the pastry rubbery. Instead, place them in a 350°F (175°C) oven or air fryer for 3-4 minutes. This recrisps the laminated edges while softening the chocolate chips inside.
Curating the Ultimate Dessert Spread
These twists are rich and decadent, so they pair beautifully with beverages that offer a bit of acidity or brightness. Consider serving them alongside a peach raspberry iced tea to cut through the richness of the milk chocolate.
For a full dessert table, you can offer these alongside homemade chocolate cake pops or even a light whipped pink lemonade for a refreshing contrast. The goal is to balance the deep, buttery notes of the pastry with vibrant, fruity flavors.
Frequently Asked Questions
You can assemble the twists and keep them refrigerated for up to 4 hours before baking. For the best visual result, do not add the powdered sugar or drizzle until after they are baked.
Yes! Puff pastry will result in an even flakier, lighter texture. However, it may require a slightly longer bake time (3-5 minutes extra) to ensure the internal cookie dough is warmed through.
Use a commercially available ‘edible’ cookie dough or heat-treat your flour at home (bake flour at 350°F for 5 minutes) and omit eggs from your homemade recipe to ensure safety.
Place them in an air fryer or oven at 350°F (175°C) for about 3-4 minutes. This restores the crispness of the pastry edges while gently melting the chocolate center.
This usually happens if the edges of the dough ‘envelope’ aren’t sealed tightly enough before twisting, or if the dough was too warm before entering the oven. Keep the dough cold until baking!
The Official Chocolate Chip Cookie Dough Twists Recipe
Chocolate Chip Cookie Dough Twists: The Ultimate Flaky and Gooey Dessert Hack
Ingredients
Equipment
Method
- Preheat your oven to 375°F (190°C) and line a large baking sheet with parchment paper. Unroll the crescent dough sheet onto a clean surface and brush with melted butter.
- Flatten the cookie dough into a rectangle and place it on one half of the crescent dough. Sprinkle milk chocolate chips over the cookie dough and fold the empty half of the crescent dough over to seal it.
- Cut the dough into 1-inch strips using a pizza cutter. Twist each strip 3-4 times and place on the baking sheet, ensuring the ends are tucked under slightly.
- Bake for 12-15 minutes until the pastry edges are deep golden-brown and crispy. The center should look soft but not raw.
- While warm, dust with powdered sugar using a sieve. Drizzle with chocolate sauce and sprinkle with mini semi-sweet chocolate chips so they cling to the warm surface.
Notes
Ensure cookie dough is room temperature for even spreading.

Final Thoughts: Master the Handheld Indulgence
The Chocolate Chip Cookie Dough Twists represent the pinnacle of home-baking creativity. By combining simple, accessible ingredients with professional techniques like lamination and temperature layering, you create a dessert that looks like a smartphone-perfect masterpiece every time. The contrast between the flaky crust and the molten center is a culinary win that never fails to impress.
We would love to see your creations! Share your photos and tag us, or head over to our Pinterest to save this recipe for your next weekend baking session. Don’t forget to leave a comment below telling us if you preferred the milk chocolate or semi-sweet variation!


