The Sonic Princess Peach drink has officially taken the internet by storm, capturing hearts with its mesmerizing pastel hues and luxurious creamy layers. If you have been scrolling through your feed and stopped dead in your tracks at the sight of a vibrant, bubbling pink elixir topped with a golden drizzle, you are not alone. This drink is more than just a beverage; it is a visual masterpiece that tastes like a liquid peach cobbler served over the most satisfying ice imaginable.
Recreating this viral sensation at home requires more than just mixing soda and syrup. To achieve that signature “handheld smartphone photo” aesthetic, you need to understand the culinary physics of layering liquids with varying densities. This guide will walk you through every step to ensure your Sonic Princess Peach drink looks exactly like the high-definition, condensation-beaded beauty you have been dreaming of.
Whether you are looking for a refreshing afternoon pick-me-up or a stunning centerpiece for your next brunch, this recipe delivers on every level. We are focusing on the precise ratios of fizzy carbonation to thick heavy cream, ensuring that every sip is a perfect balance of sharp bubbles and velvety smoothness. Let’s dive into the science and soul of this peach-infused masterpiece.
Why the Sonic Princess Peach Drink is a Summer Sensation
- Textural Contrast: The combination of sharp, fizzy pastel pink soda against the rich, velvety cascade of heavy cream creates a unique mouthfeel that is both light and indulgent.
- The Iconic Nugget Ice: Utilizing crushed nugget ice isn’t just for show; the increased surface area helps maintain a bone-chilling temperature while providing the perfect “crunch” that fans of the original drive-in crave.
- Vibrant Pastel Palette: The natural reaction between the peach syrup and the heavy cream creates a stunning pastel pink gradient that is virtually impossible not to photograph.
- Professional Layering: We use a specific pouring technique to ensure the heavy cream “cascades” rather than instantly mixing, giving you those professional-looking swirls.
The Anatomy of a Perfect Peach Soda: Essential Ingredients
To recreate the Sonic Princess Peach drink with forensic accuracy, we must select ingredients that provide both the correct flavor profile and the necessary physical properties for layering.
Peach Simple Syrup: 3 tbsp (45ml)
A high-quality, golden-orange peach syrup is the soul of this drink. It provides the heavy sugar base that anchors the bottom of the glass, ensuring the flavors don’t just float away.
Pastel Pink Fizzy Soda: 1 cup (240ml)
You can achieve this by using a clear sparkling water mixed with a drop of pink food coloring, or a light-colored peach sparkling soda. The carbonation must be aggressive to provide the “bubbly” texture seen in the visual blueprint.
Crushed Nugget Ice: 2 cups (approx. 300g)
This is a non-negotiable for the “Sonic” experience. If you don’t have a pebble ice maker, you can pulse standard cubes in a blender until they reach a glistening, crushed consistency.
Heavy Cream: 1/4 cup (60ml)
Use full-fat heavy cream (at least 36% milkfat). The high fat content is what allows the cream to swirl and cascade through the soda rather than simply dissolving into it.
Whipped Cream: For topping
A generous dollop of sweetened whipped cream provides the structural support for the final garnishes. It acts as a cloud-like bed for the syrup and fruit.
Fresh Peach Slices: 1-2 slices
Use ripe, juicy peaches with the skin on for a pop of color. The slice should be firm enough to rest on the rim without collapsing.
Glossy Peach Drizzle: 1 tsp (5ml)
A final touch of the thick syrup over the whipped cream adds that “glossy” finish that catches the light in photos.
Tools for Achieving the Viral Visual Layers
Achieving the look of a viral Sonic Princess Peach drink requires a few specific tools to manage the temperature and the pour. A tall, clear highball glass or a classic soda fountain glass is essential to showcase the cascading cream. You will also need a long-handled bar spoon; this isn’t just for stirring, but for “breaking” the pour of the cream to create the swirl effect.
Precision is key, so keep a set of liquid measuring cups nearby. To get that “beaded condensation” look, ensure your glass is chilled in the freezer for at least 10 minutes before you begin assembly. The temperature differential between the cold glass and the humid air is what creates those beautiful water droplets on the exterior.
Mastering the Pour: Step-by-Step Instructions
Creating the Bubbly Pastel Foundation
Start by adding your peach syrup to the bottom of the chilled glass. Slowly pour in the sparkling water or peach soda. If you are using clear water, add a tiny drop of pink coloring now and stir gently with your bar spoon. You want to see vibrant bubbles rising through a translucent, pastel pink base. Do not over-stir, as you want to preserve as much carbonation as possible for that “fizzy” visual.
The Art of the Nugget Ice Pack
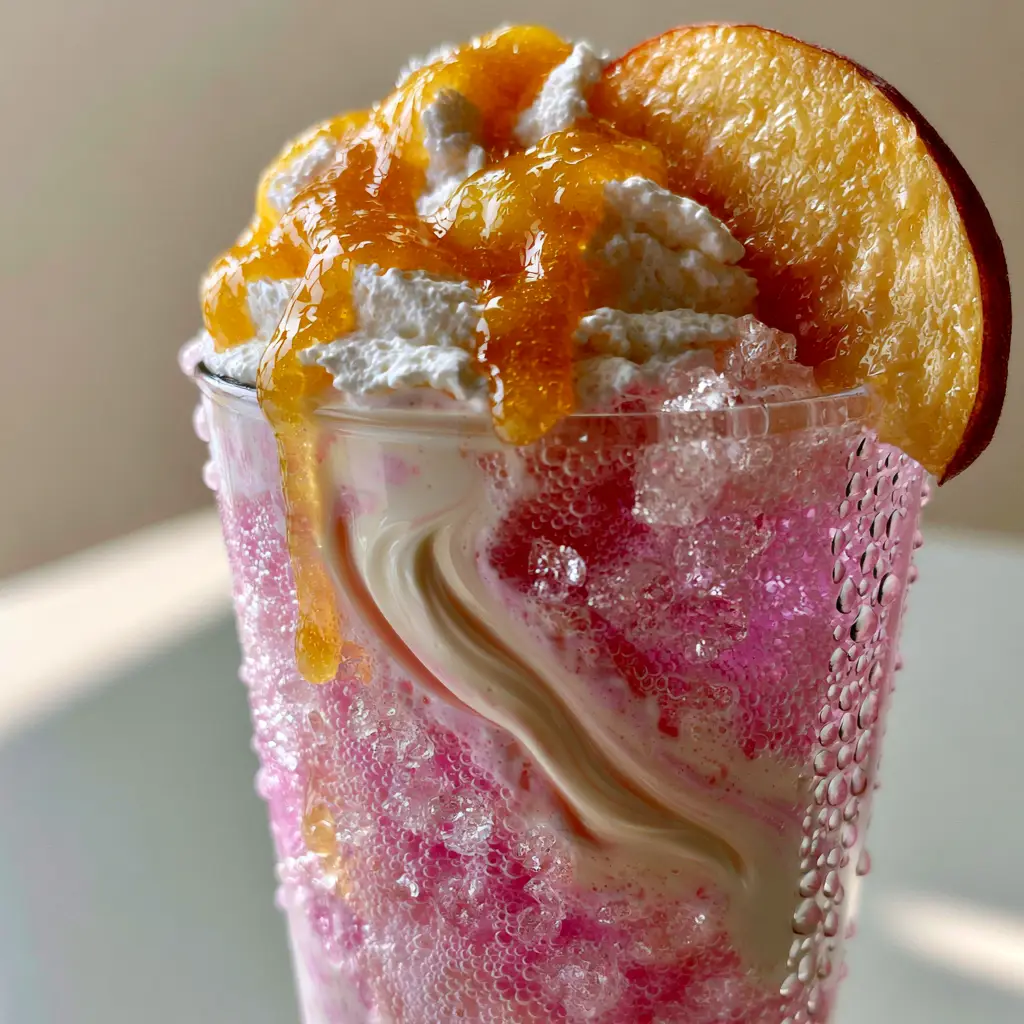
Fill the glass to the very top with your glistening crushed nugget ice. The ice should be packed tightly enough to act as a filter for the cream we are about to add. The ice should reach just above the rim of the glass, creating a “dome” effect that will support the whipped cream later. Watch for the way the pink liquid fills the gaps between the ice crystals, creating a shimmering effect.
Executing the Heavy Cream Cascade
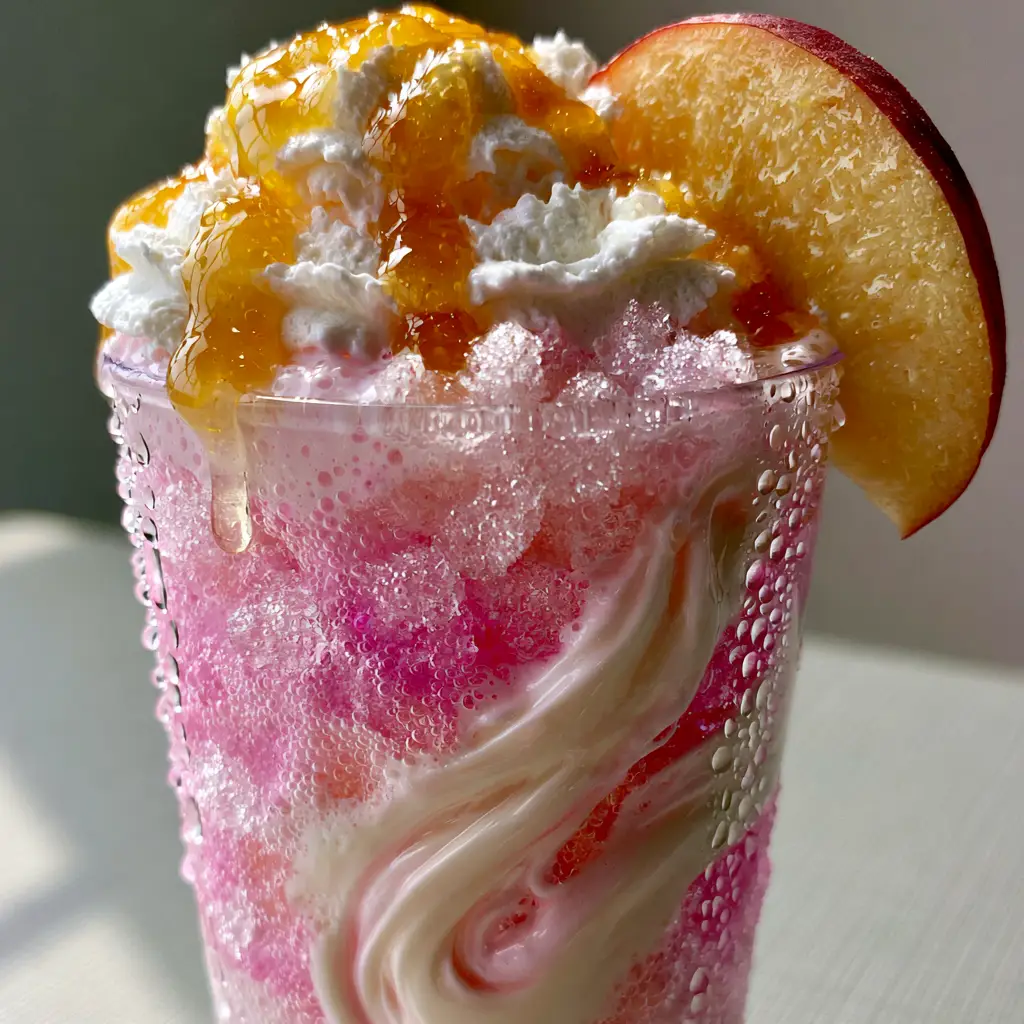
This is the most critical step for the Sonic Princess Peach drink aesthetic. Take your heavy cream and pour it very slowly over the back of a bar spoon, held just above the ice. This technique, known as “floating,” allows the cream to gently seep down through the nugget ice. You will see it begin to swirl and cascade in thick, white ribbons through the pink soda. Stop once you see the cream reaching the middle of the glass.
Crowning and Garnishing for Maximum Impact
Pipe or spoon a generous dollop of whipped cream onto the center of the ice dome. Take your remaining peach syrup and drizzle it in a circular motion, allowing it to pool slightly in the crevices of the whipped cream—this creates that “glossy golden-orange” highlight. Finally, take a fresh peach slice and cut a small notch into the flesh. Secure it firmly to the rim of the glass so it sits upright, looking juicy and inviting.
Expert Tips for a Picture-Perfect Peach Soda
- Temperature Control: Ensure the heavy cream is ice-cold. If the cream is room temperature, it will mix too quickly with the soda and you will lose the distinct “swirl” effect.
- Soda Choice: If you prefer a less sweet drink, use a peach-flavored seltzer like LaCroix or Bubly. The syrup at the bottom will provide enough sweetness once you eventually stir it.
- Prevent Curdling: Occasionally, the acidity in certain sodas can cause cream to curdle. To prevent this, ensure your soda is poured first and the cream is added to the ice, which buffers the interaction.
- The Smartphone Shot: To get the “handheld smartphone photo” look from the prompt, use natural side-lighting (like a window) and tap your screen to focus on the condensation beads on the glass.
The Best Pairings for Your Creamy Peach Creation
This Sonic Princess Peach drink is a sweet, decadent treat that pairs beautifully with salty or savory snacks to balance the palate. If you are hosting a summer gathering, consider serving this alongside some grilled peach appetizers to lean into the stone fruit theme. For a full dessert spread, these chewy s’mores bars offer a toasted marshmallow flavor that complements the creamy peach perfectly.
If you’re looking for more refreshing options for a crowd, this drink sits perfectly next to a large bowl of fruit-based punch or other summer batch cocktails. For those who love the “cream soda” vibe, you might also enjoy experimenting with a raspberry colada twist for a different color profile but the same luxurious texture.
Frequently Asked Questions
Yes, you can substitute the heavy cream with full-fat coconut milk or a barista-blend oat milk. Note that the visual ‘cascade’ might be slightly less defined due to the lower fat content.
The key is using nugget ice and pouring the heavy cream very slowly over a spoon. The ice acts as a barrier that slows the cream’s descent, creating those beautiful cascading ribbons.
The drink typically uses a peach-flavored soda or a mixture of lemon-lime soda and peach syrup. For the viral pastel pink look, a light-colored peach sparkling water or soda is used, often enhanced by the interaction with heavy cream.
Many grocery stores sell ‘pebble ice’ by the bag, or you can pulse standard ice cubes in a high-speed blender for a few seconds until they reach a small, crushed consistency.
Yes, because the syrup has a higher sugar content and density than the soda and cream, it will naturally settle at the bottom. This creates a beautiful gradient, but you should stir it gently before drinking for the best flavor.
The Official Sonic Princess Peach Drink Recipe
Sonic Princess Peach Drink: The Ultimate Viral Creamy Peach Soda Recipe
Ingredients
Equipment
Method
- Add 2 tbsp of peach syrup to a tall chilled glass. Pour in the pink peach soda and stir gently to combine until the liquid is a bubbly pastel pink.
- Fill the glass to the brim with crushed nugget ice, ensuring it forms a slight mound at the top.
- Slowly pour the heavy cream over the back of a spoon onto the ice. Observe the cream swirling and cascading down through the soda layers.
- Add a generous dollop of whipped cream on top of the ice mound. Drizzle the remaining 1 tbsp of peach syrup over the whipped cream for a glossy finish.
- Place the fresh peach slice on the rim of the glass. Serve immediately while the condensation is visible.
Notes
If using clear sparkling water, add a single drop of red/pink food coloring to achieve the pastel look.
Closing & Call to Action
The Sonic Princess Peach drink is more than just a viral trend; it is a masterclass in how simple ingredients like soda, cream, and fruit can be transformed into a work of art. By following these forensic steps—from the nugget ice to the heavy cream cascade—you can enjoy a drive-in quality experience in the comfort of your own kitchen. The balance of fizzy peach and velvety cream is a flavor profile that truly defines summer refreshment.
If you enjoyed making this recipe, we would love to see your creations! Tag us in your photos and let us know how your layers turned out in the comments below. Don’t forget to follow us on Pinterest for more viral drink recreations and summer inspiration. Pin this recipe to your “Summer Drinks” board so you always have it ready for your next sunny day!